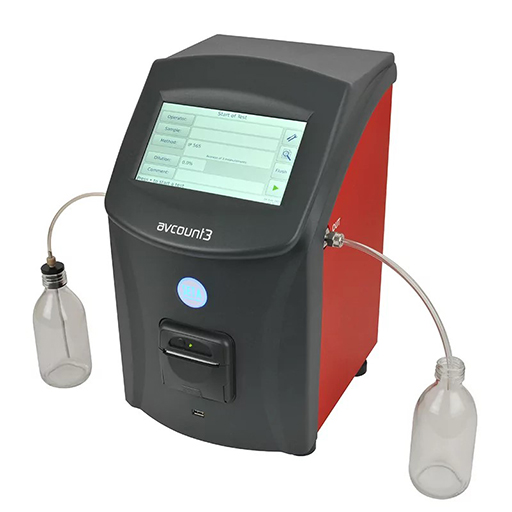
Save time and money by running regular verifications on your AvCount3 Particle Counter.
Ensure the accuracy and reliability of your AvCount3 Particle Counter.
Identify potential issues or discrepancies in the analyzer’s performance early to allow for timely maintenance or calibration and prevent costly downtime.
VERIFICATION
Verify the AvCount3’s performance according to the following schedule. When you start the instrument, a reminder displays on-screen if the 6-monthly verifications are due.
Verification schedule
Pump flow rate – every six months
Particle count – every six months
- You should also verify the instrument flow rate and particle count if:
- The instrument is producing unusual results
- You have removed the sensor for cleaning or replaced it
- You have calibrated the instrument
- You have replaced the pump
Caution: Do not attempt to remove the pump or sensor unless you have been trained by Seta Analytics to do so. Doing so may damage the components and invalidate your warranty. Return the instrument to Lazar Scientific for repair if you have not had the necessary training.
Verifying the pump flow rate
You must verify the pump flow rate every six months. Do so by measuring the volume of liquid discharged with each stroke of the pump and the pump stroke time for an IP 565 test. For this test, use heptane filtered through a 0.45 μm filter. The pump strokes eight times during an IP 565 test.
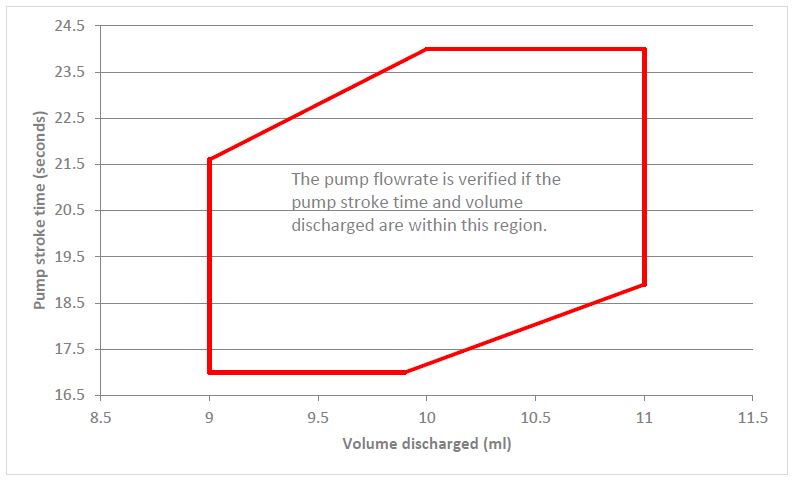
If the pump flow rate is within the limits in Table 2 and Figure 6 below, verify the particle count by following the instructions below.
If the pump flow rate is outside the required limits, check the instrument for leaks or blockages by following the instructions in step 14 below. Repair any leaks in the external tubing, clean the instrument, and repeat the test. If the pump flow rate is still outside the required limits, contact Lazar Scientific for advice.
To verify the pump flow rate:
NOTE: All users can perform this task.
NOTE: You can stop the test at any time by pressing STOP.
NOTE: You need the following equipment to verify the pump flow rate:
- A graduated measuring cylinder with 1 ml graduations and a minimum volume of 50 ml.
- A stopwatch
- 300 ml heptane filtered through a 0.45 μm filter
1. Prepare the instrument by following the instructions in section 4.2 of the operations manual.
2. Pour filtered heptane into the sample container and follow the instructions in section 4.3.1 of the operations manual to connect the sample container to the instrument.
3. Run a single test in accordance with IP 565 by following the steps in section 4.4 of the operations manual.
NOTE: – Running a test before verifying the pump flow ensures that the instrument is fully primed with heptane and makes the verification test is as accurate as possible.
4. Insert the waste tube into a graduated measuring cylinder.

5. Run a test in accordance with IP 565 by following the instructions in section 4.4 of the operations manual.
6. Start the stopwatch when you hear the pump start.
NOTE: – Before the pump starts for each pump stroke, you will hear a low-pitch sound for a short time as the changeover valve moves into position. The higher pitch sound that follows is the pump motor. Start the stopwatch when you hear the pump motor.
Caution: You must operate the stopwatch in time with the sound of the pump motor, not by observing the on-screen graphics or the flow of heptane into the measuring cylinder. The graphics do not provide an accurate representation of the pump stroke time. The volume of liquid in the waste pipe also makes the latter method inaccurate.
7. Stop the stopwatch when you hear the pump stop. Record the elapsed time and the volume of heptane in the measuring cylinder.
8. Empty the measuring cylinder.
9. Repeat steps 6 to 8 for each pump stroke in the test sequence.
NOTE: – The pump strokes eight times during the IP 565 test, so you will take eight volume and time measurements.
10. Check that the volume of heptane discharged into the measuring cylinder for each of your 8 measurements is 10 ml ± 1 ml.
11. Calculate the average of the eight volume measurements that you recorded during the verification test. This is the average volume discharged in ml.
12. Calculate the average of the eight time measurements that you recorded during the verification test. This is the average pump stroke time in seconds.
13. Do one of the following:
- If for the average volume discharged, the average pump stroke time is within the region bounded by the red line in Figure 6 below, or is within the limits given in Table 2 below, the pump flowrate is verified. Go to step 15.
- If for the average volume discharged, the average pump stroke time is outside the region bounded by the red line in Figure 6 below, or is outside the limits given in Table 2 below, the pump flowrate is outside the required specification. Go to step 14.
14. Check the instrument for leaks and blockages by proceeding as follows:
14.1. Run an IP 565 test using heptane by following the instructions in section 4.4 of the operations manual.
14.2 Note: – Excessive air bubbles in the waste line may indicate a leak at the inlet to the instrument.
If there are excessive bubbles in the waste line, check the following for leaks:
- Sample tube
- Inlet connector including O-ring (see section 8.4.2 of the operations manual)
- Connection between the sample tube and the sample probe.
Also, check that there is adequate heptane in the sample container and the sample probe is submerged.
14.3 While a test is running, place your finger over the end of the waste tube for a short time to seal it. Remove your finger to release the pressure. The variation in pressure may dislodge debris that has accumulated in the measurement cell or waste pipe.
14.4 When the test is complete, check the particle count for the 4-μm size band and do one of the following:
- If the particle count ≤ 50, go to step 14.7.
- If the particle count > 50, go to step 14.5.
14.5 Check the sample probe and sample tube for blockages. Disconnect the sample tube from the instrument and clean if necessary.
14.6 If you have been trained to do so, clean the measurement cell by following the instructions in the service manual.
14.7 Repeat the flow verification test by repeating steps 1 to 12. Then go to step 14.8.
14.8 Do one of the following:
- If for the average volume discharged, the average pump stroke time is within the region bounded by the red line in Figure 6 below, or is within the limits given in Table 2 below, the pump flowrate is verified. Go to step 15.
- If for the average volume discharged, the average pump stroke time is outside the region bounded by the red line in Figure 6 below, or is within the limits given in Table 2 belwo, the pump flowrate is outside the required specification. Contact Seta Analytics for advice.
15. Verify the particle count by following the instructions in section 6.1.2 below.
Table 2: Pump stroke time and flow rate limits as a function of volume discharged
| Volume discharge (ml) | Pump stroke time | |
|---|---|---|
| Minimum | Maximum | |
| 9.0 | 17.0 | 21.6 |
| 9.1 | 17.0 | 21.9 |
| 9.2 | 17.0 | 22.1 |
| 9.3 | 17.0 | 22.4 |
| 9.4 | 17.0 | 22.6 |
| 9.5 | 17.0 | 22.8 |
| 9.6 | 17.0 | 23.1 |
| 9.7 | 17.0 | 23.3 |
| 9.8 | 17.0 | 23.6 |
| 9.9 | 17.0 | 23.9 |
| 10.0 | 17.2 | 24.0 |
| 10.1 | 17.4 | 24.0 |
| 10.2 | 17.5 | 24.0 |
| 10.3 | 17.7 | 24.0 |
| 10.4 | 17.9 | 24.0 |
| 10.5 | 18.0 | 24.0 |
| 10.6 | 18.2 | 24.0 |
| 10.7 | 18.4 | 24.0 |
| 10.8 | 18.6 | 24.0 |
| 10.9 | 18.7 | 24.0 |
| 11.0 | 18.9 | 24.0 |
Figure 6: Flow verification limits
Verifying the particle count
You must verify the particle count every 6 months, using the AvCount verification material listed in section 11.1.1 of the operations manual.
As with all tests, it is essential that you follow the guidelines in section 4.1 of the operations manual for avoiding contamination. The particle count verification will fail if you do not take steps to ensure the cleanliness of the instrument and avoid contamination.
Before testing the verification material, you must flush the instrument with filtered heptane until the particle count for the 4-μm size band is ≤ 50.
Sample preparation is critical to the success of a verification test. If you do not prepare the verification material correctly, the particle count verification will fail. After preparing the verification material, run the verification test. If the test results are within the limits given on the verification material certificate, the instrument has passed the particle count verification. If the instrument fails the particle count verification, it may require further cleaning and re-calibration. Contact Seta Analytics for advice.
After testing the verification material, you must flush the instrument with filtered heptane until the particle count for the 4-μm size band is ≤ 50.
To verify the particle count:
NOTE – You will need the following equipment to verify the particle count:
- 200-600 ml heptane filtered through a 0.45 μm filter to complete this task. The volume of heptane required depends on the cleanliness of the instrument.
- 250 ml AvCount verification material SA1006-0
- Ultrasonic water bath with a power density in the range
3–10 kW/m2, such as 99320-2 listed in section 11.1.1 - Bottle tumbler, such as SA1010-0 listed in section 11.1
NOTE – You can stop the verification at any time by pressing STOP.
1. Observe the guidelines for avoiding contamination given in section 4.1.
2. Empty the waste container.
3. Clean the glassware, sample probe and adjustable stopper by following the instructions in section 4.2.3 of the operations manual.
4. Pour filtered heptane into the sample container and follow the instructions in section 4.3.1 of the operations manual to connect the sample container to the instrument and adjust the sample probe.
5. Follow the instructions in section 4.10 of the operations manual, to flush the instrument. In step 2, press Flush until. Press the data field to the right, enter 50 and press RUN.
NOTE – The instrument may flush up to 20 times if the measurement cell is very dirty.
6. Check the particle count for the 4-μm size band while the instrument is flushing and do the following:
- If the particle count ≤ 50, go to step 13.
- If the particle count > 50, go to step 7.
7. Repeat steps 2 to 5 and flush the instrument with filtered heptane a second time.
8. Check the particle count for the 4-μm size band while the instrument is flushing and do the following:
- If the particle count ≤ 50, go to step 13.
- If the particle count > 50, go to step 9.
9. Repeat steps 2 and 3.
10. Open a fresh bottle of filtered heptane. Pour heptane into the sample container and follow the instructions in section 4.3.1 of the operations manual to connect the sample container to the instrument.
11. Follow the instructions in section 4.10 of the operations manual, to flush the instrument. In step 2, press Flush until. Press the data field to the right, enter 50 and press RUN.
NOTE – The instrument may flush up to 20 times if the measurement cell is very dirty.
12. Check the particle count for the 4-μm size band while the instrument is flushing and do the following:
- If the particle count ≤ 50, go to step 13.
- If the particle count > 50, the instrument may need cleaning and recalibration. Contact Lazar Scientific for advice.
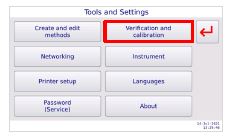
13. Access the settings screen, and if necessary, enter the user or service password by following the instructions in section 4.11.1.1.
13. Access the settings screen, and if necessary, enter the user or service password by following the instructions in section 4.11.1.1 of the operations manual.
14. Press Verification and calibration.
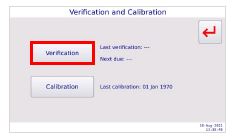
15. Press Verification.
16. Press Bottle number, enter the number marked on the bottle and press ok.
17. Press Batch number, enter the number marked on the bottle and press ok.
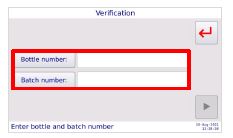
18. Press RUN.

19. Press 4 μm, enter the expected count from the verification material certificate and press OK.
20. Press 6 μm, enter the expected count from the verification material certificate and press OK.
21. Press 14 μm, enter the expected count from the verification material certificate and press OK.
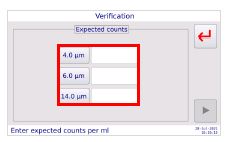
22. Press RUN.

NOTE – The verification check screen displays.
NOTE – You can disable check screens by following the instructions in section 4.11.11 of the operations manual.

23. Empty the waste container by following the instructions in section 4.2.2 of the operations manual.
24. Press Check waste container to confirm that there is adequate capacity in the waste container or that you have emptied it.
NOTE – A tick appears when you confirm completion.

25. Clean the sample probe and stopper by following the instructions in section 4.2.3 of the operations manual.
26. Press Rinse sample probe and attach to confirm that you have cleaned the sample probe and connected it.
NOTE – A tick appears when you confirm completion.

!! PRECISE SAMPLE PREPARATION IS IMPERATIVE FOR AN ACCURATE RESULT !!
27. Prepare the bottle of verification material as follows:
27.1. Shake the bottle very vigorously for 1 minute to disperse the particles throughout the liquid.
Give it your all when shaking the bottle. If you think you are shaking hard enough, shake harder.
27.2. Loosen the bottle cap and place the bottle in an ultrasonic bath for 1 minute to break up agglomerated particles and release any air bubbles entrained during shaking.
27.3. Tighten the bottle cap and place the bottle in the bottle tumbler. Tumble the bottle, end over end, at a rate of one turn per second, for 1 minute.
27.4. Loosen the bottle cap and place the bottle in an ultrasonic bath for 20 seconds to release any air bubbles entrained during tumbling.
27.5. Test the verification material immediately.

28. Follow the instructions in section 4.3.1 of the operations manual to connect the sample container to the instrument and adjust the sample probe.
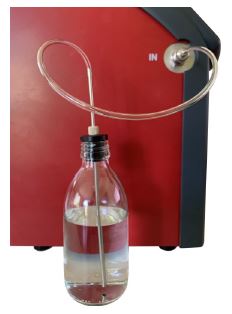
29. Press Prepare sample as per method to confirm that you have prepared the sample in accordance with the test method.
NOTE – A tick appears when you confirm completion.

30. Press RUN.

NOTE – The flushing sequence starts. This consists of five flushes.
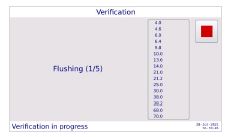
NOTE – When the flushing sequence completes, the instrument measures the verification sample.
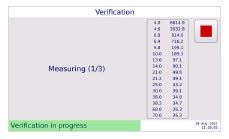
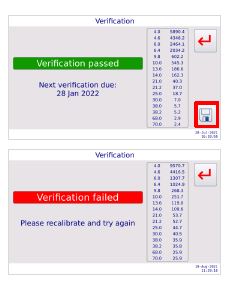
31. NOTE – If the verification was successful, Verification passed and the next verification date display. If the verification was unsuccessful, Verification failed. Please recalibrate and try again displays.
Do one of the following:
- If Verification passed displays, press SAVE to save the verification data, then go to step 32.
- If Verification failed displays, the instrument may need cleaning and recalibration.
32. Clean the instrument as follows:
32.1. Empty the waste container.
32.2. Clean the glassware, sample probe and adjustable stopper by following the instructions in section 4.2.3 of the operations manual.
32.3. Pour 250 ml filtered heptane into the sample container and follow the instructions in section 4.3.1 of the operations manual to connect the sample container to the instrument and adjust the sample probe.
32.4. Follow the instructions in section 4.10 of the operations manual, to flush the instrument. In step 2, press Flush until. Press the data field to the right, enter 50 and press RUN.
NOTE – The instrument may flush up to 20 times if the measurement cell is very dirty.
32.5. Check the particle count for the 4-μm size band while the instrument is flushing and do the following:
- If the particle count ≤ 50, go to step 33.
- If the particle count > 50, go to step 32.6.
32.6. Repeat steps 32.1 to 32.4 and flush the instrument with heptane a second time.
32.7. Check the particle count for the 4-μm size band while the instrument is flushing and do the following:
- If the particle count ≤ 50, go to step 33.
- If the particle count > 50, go to step 32.8.
32.8. Repeat steps 32.1 and 32.2.
32.9. Open a fresh bottle of filtered heptane. Pour 250 ml heptane into the sample container and follow the instructions in section 4.3.1 of the operations manual to connect the sample container to the instrument.
32.10. Follow the instructions in section 4.10 of the operations manual, to flush the instrument. In step 2, press Flush until. Press the data field to the right, enter 50 and press Run.
NOTE – The instrument may flush up to 20 times if the measurement cell is very dirty.
32.11. Check the particle count for the 4-μm size band while the instrument is flushing and do the following:
If the particle count ≤ 50, go to step 33.
If the particle count > 50, the instrument may need cleaning and recalibration. Contact Lazar Scientific for advice.
33.The instrument is ready for use.
